Saturday, 31 December 2016

Configure HMC in Hybris

Check if HMC extension is configured
  • log into http://localhost:9001/ using admin credentials
  • Under Platform--> Initialization, I initialized to recreate the new tables.
Apart from the above, I did not do any other steps. I noticed that the extensions under HMC in Platform-->Extension, are all marked as X. Please refer to the attached image.
You are missing the hmc as part of your localextensions.xml file. you can locate the xml from this path "F:\Hybris\HYBRIS6\hybris\config\localextension.xml".
Sample localextension.xml file
        <!-- ext-template -->
<extension name="yempty" />
<extension name="yhacext" />
<extension name="admincockpit" />
<extension name="backoffice" />
<extension name="cockpit" />
<extension name="hmc" />
<extension name="platformhmc" />
<extension name='mcc' />
<extension name='commercesearchbackoffice' />
<extension name='commerceservicesbackoffice' />
<extension name='solrfacetsearchbackoffice' />
<extension name='solrserver' />
<extension name='yacceleratorcockpits' />
<extension name='yacceleratorinitialdata' />
<extension name='yacceleratorfulfilmentprocess' />
<extension name='yacceleratorstorefront' />
<extension name='yaddon' />
<extension name='ycommercewebservices' />
<extension name='electronicsstore' />
<extension name='apparelstore' />
<extension name='liveeditaddon' />
<extension name='acceleratorwebservicesaddon' />
After adding the hmc extension you have to run an update running system from the HAC (or re-initialize).
Installing Hybris 6

Hybris Installation
Follow below instruction to insall Hybris environment.
  1. Download JDk 8 from here
  • Accept licence terms and conitions.
  • Download as per your windows bit (32 or 64)
  • Once downloaded, install jdk by double clicking it. Follow the default instructions by clicking next.
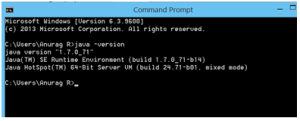
  • Once installed, you should can verify installation in command prompt.
  • setant
  • Download the Hybris  from here.

Saturday, 10 December 2016

Creating an Adobe Experience Manager HTL Headline component

You can create an Adobe Experience Manager (AEM) Headline component that you can use in your AEM web page. A headline component lets your website visitors read latest headlines about a specific subject. That is, you can enter keyword into an AEM dialog and the component will display headlines related to the keyword. For example, you can enter Facebook keyword and the component displays headlines, as shown in the following illustration.

Monday, 5 December 2016

AEM Forms vs AEM out-of-box Form Component

AEM Forms vs AEM out-of-box Form Component 
It depends on your use case, if you have one or two simple forms where you want to capture 5 fields of information then the OOTB forms would suffice.  However if you have this requirement, moderately complex, and/or complex forms then AEM Forms would be a better solution.  Here are some of the details as to why I make this statement:
1)  Form model capabilities - being able to bind a form to a schema or XDP form for ease of back end integration
2) Rule builder as an example of being able to add logic to a form without the requirement of scripting including access to web services
3) Document of record - in many cases upon submission of data there is a desire to create an archive of the submission, AEM Forms can create PDF and PDF/A documents by utilizing OOTB services and either no or little coding
4) If you have a need for adding attachments to the form and using them as part of archive or welcome kit - AEM Forms OOTB can convert other document types to PDF and then combine these documents together along with page numbering, table of contents, bookmarks ect....
5) Batch capabilities - perhaps you have a requirement to merge data onto a template and produce print output that's directed to printer or bulk PDF creation
6) OOTB correspondence management capabilities to manage documents such as contracts
7) A much richer set of components that come OOTB to ensure the best possible user experience
8) One click Marketing Cloud integration - easily add in Analytics, Adobe Sign, Target using the built in Forms Manager
9) Sophisticate form capabilities such as form fragments, form sets, lazy loading - these all ensure ease of form authoring and ensure a high performing user experience
10) Forms Manager to manage all your forms - dictionary translation, initiate review and comment, find relationships between forms and form fragments ect....

Sunday, 4 December 2016

Sling Dynamic Include

The purpose of the sling dynamic include (SDI) is to replace dynamic generated components (eg. current time or foreign exchange rates) with server-side include tag (eg. SSI or ESI). Therefore the dispatcher is able to cache the whole page but dynamic components are generated and included with every request. Components to include are chosen in filter configuration using resourceType attribute.
When the filter intercepts request for a component with given resourceType, it'll return a server-side include tag (eg. <!--#include virtual="/path/to/resource" --> for Apache server). However the path is extended by new selector (nocache by default). This is required because filter has to know when to return actual content.
Components don't have to be modified in order to use this module (or even aware of its existence). It's servlet filter, installed as an OSGi bundle and it can be enabled, disabled or reconfigured without touching AEM installation.
Let's try ☺
Lets do this practically by loading a component with and without SDI. 


Saturday, 3 December 2016

Git command reference

Git reference docs: Click here
Download Git cheat sheet PDF

Git Cheat sheet-2


Git Cheat sheet-1


Git visual guide

Basic Usage

The four commands above copy files between the working directory, the stage (also called the index), and the history (in the form of commits).
  • git add files copies files (at their current state) to the stage.
  • git commit saves a snapshot of the stage as a commit.
  • git reset -- files unstages files; that is, it copies files from the latest commit to the stage. Use this command to "undo" a git add files. You can also git reset to unstage everything.
  • git checkout -- files copies files from the stage to the working directory. Use this to throw away local changes.
You can use git reset -pgit checkout -p, or git add -p instead of (or in addition to) specifying particular files to interactively choose which hunks copy.

Read More

Merge child branch with master

Merge master into the development first so that if there are any conflicts, I can resolve in the development branch itself and my master remains clean.

(on branch child)$ git merge master
(resolve any merge conflicts if there are any)
$ git checkout master
$ git merge child(there won't be any conflicts now)


Dispatcher serving, but not caching - request contains authorization

Problem:
Dispatcher is configured but pages are not getting cached due to request containing authorization.

Error:
[Thu Dec 03 7:58:58 2012] [D] [820(139934505617152)] no cache due to authorization header.
[Thu Dec 03 7:58:58 2012] [D] [820(139934505617152)] cache action for [http://localhost/content/geometrixx/en/toolbar.html] NONE

Solution:
By default, if the HTTP request includes an authorization header, the cache is not used. There is a property in the dispatcher.any file:

/allowAuthorized "1" - allow cache if request include authorization header.

Example:
/cache {
   /docroot "C:/Apache2/dispatcher/cache"
   /allowAuthorized "1"
   /rules {
    /0000 {
     /glob "*"
     /type "allow"
    }
   }
  }

Note: See how to configure dispatcher

Friday, 2 December 2016

Uploading assets using FTP job scheduling

You can upload assets from an FTP site to Adobe Experience Manager (AEM) Assets using the FTP job scheduling feature. You can either upload an asset immediately or schedule a periodic upload job at a particular time.
The FTP site is already configured in AEM Assets. You should have the required FTP credentials to connect to the site.

See the FTP Upload video from Adobe TV.

Configure dispatcher for AEM

Create simple Author -> Publish -> Dispatcher configuration on developer's box (not production). Assuming Author aem is running on port 4502 and Publish aem on port 4503, this post is on adding & configuring dispatcher module on Windows Apache 2.2 Http Server running on port 80. For product documentation on configuring dispatcher check this page and this page

Author - Create Page

1) Start by creating a template on author or download this sample package (contains template Basic Template); installing it creates the following structure (/apps/samples) in CRX (http://localhost:4502/crx/de)

Thursday, 1 December 2016

Create a Nested Multi-Field CQ Dialog Widget

Nested multi-field cq dialog widget  or custom Adobe Experience Manager (AEM) component is one that uses a nested multi-field control located in a dialog. A nested multi-field control is an inner multi-field control within an outer multi-field control and lets an author dynamically enter data. 

For example, assume the AEM control lists developers and each developer has an unknown number of skills to display. That is, within the inner multi-field, the author enter details such as professional skill set. The outer multi-field determines how may developers to display. 

Lets create Nested multi-field cq dialog widget as shown below:

Implement 301 and 302 Redirect in AEM

Adobe Experience Manager(AEM) SEO best practices suggest use of 301 or 302 redirect in AEM.

Difference Between 301 and 302 Redirect 


Status code 301 means that this webpage no longer exists, the engine search for location header in response pick the new URL and replace the indexed URL with the new one and also transfer page rank.

Note:- In case of 301 redirect browser cache the mapping of new url with old url. 

Status code 302 tells the crawlers or browser to redirect this webpage temporarily to the new location and crawl both of the pages. The old webpage URL still exists in the search engine database and when we make hit to new URL , it always attempts to request both the old location and new location and crawl it.

Note:- In case of 302 redirect browser does not maintain any mapping or cache. So, server receives hit for both the url’s. 

Tuesday, 29 November 2016

External redirect for an AEM page

In order to redirect an AEM page to external url follow the below steps
  • Create a page with sling:resourceType=foundation/components/redirect. 
  • Goto page properties, assign the redirect url
  • Open the page in either publisher or in author instance append ?wcmmode=disabled. Now page redirect to external url.

Using the Java Query Object Model within Adobe Experience Manager

You can create an AEM application that searches the CQ repository for JCR data and displays results to the end user. For example, you can search CQ pages under a specific repository node (for example, nodes under /content) and look for a specific search term. All content that satisfy the search criteria are included in the search results. To search the Experience Manager repository, you use the JCR Query Object Model (JQOM) API. For information about the API, see Interface QueryObjectModel
JQOM is an AEM query language that is like ‘prepared statements’ and SQL2 is like ‘statements’ in JDBC queries. For example, a use case may require all JCR nodes from ‘Geometrixx’ which has the property pageTitle.

Selector selector = qf.selector("cq:PageContent", "s"); 
Constraint constriant = qf.descendantNode("s", "/content/geometrixx");
constriant = qf.and(constriant, qf.propertyExistence("s", "pageTitle"));
QueryObjectModel qm = qf.createQuery(selector, constriant, null, null);
QueryObjectModelFactory gets the instance of the JCR Object Model.  The Selector is used to set the type of node that the query needs to look at. The s parameter is simply an alias. Constraint is used to add all the constraints which is like a where condition into the query model. Finally a query is created with the selector and constraint that captures the response as a QueryObjectModel. 

JQOM Results

Read More

Friday, 25 November 2016

Uncaught TypeError: Cannot read property 'extend' of undefined' - cq.extend

When we try to create a custom widget we extend the widget from the CompositeField. When we render this custom widget script, we may get error like "Uncaught TypeError: Cannot read property 'extend' of undefined' ".

Solution:

When custom component adds a dependency on cq.widgets it will always fail in the publisher.

When we include below statement in clientlibs, this script is also evaluated in the publisher for the purpose of assigning the variable, even if it is never used.

Search.CustomWidget = CQ.Ext.extend(CQ.form.CompositeField, { 
You can make this work by having the authoring part completely separated from the rest of the component, so that the publisher never tries to execute any part of it. For example by using a different category which is only included using WCMMode.fromRequest(request) != WCMMode.DISABLED

Thursday, 24 November 2016

Adobe AEM - Cross Domain AJAX Request

A common problem for developers is a browser to refuse access to a remote resource. Usually, this happens when you execute AJAX cross domain request using jQuery or plain XMLHttpRequest. As result is that the AJAX request is not performed and data are not retrieved.


jquery ajax cross domain
Figure 1. The same-origin policy restriction in effect

ERROR:

XMLHttpRequest cannot load http://remote-domain/url. No 'Access-Control-Allow-Origin' header is present on the requested resource. Origin 'https://localhost:5433' is therefore not allowed access

SAME-ORIGIN POLICY

This is a security policy who defines the rules of how a web page can access an external resource (e.g. fonts, AJAX requests). Under the same-origin policy, web browsers do not permit a web page to access resources who origin differ than that of the current page. The origin is considered to be different when the scheme, hostname or port of the resource do not match that of the page. Overcoming the limitations of same-origin security policy is possible using a technique called Cross-origin resource sharing or simply CORS.

Wednesday, 23 November 2016

Hooking to Cache Invalidation in AEM 6.1

If you need to implement custom cache invalidation based on some event, you can write a workflow service or servlet (Which ever suits best to your requirement). In this Java class you can write code to handle this. The OOTB Flush Service can be utilized for this purpose-

    import com.adobe.cq.social.ugcbase.dispatcher.api.FlushService;
    @Reference
    FlushService flushService;

Then you can simply request a cache invalidation for the corresponding page-
flushService.sendFlushUrl("userId",
                    FlushService.FlushType.IMMEDIATE_FLUSH, resourceUrl,
                    FlushService.RefetchType.IMMEDIATE_REFETCH,
                    new String[] { resourceUrl });

Here resourceUrl is the path of the page without html extension.

In order to make the flush service working properly, create flush agents for each dispathcer with following additional settings-

1. Set the Request method - "POST" because this service expects a POST method flush agent.
2. Send additional parameter for "resource only replication" 

-To debug any issues you can add a custom logger from OSGi configurations console on this package-
com.adobe.cq.social.ugcbase.dispatcher.impl.FlushServiceImpl

ACM AEM Commons tool also provides options to help implementing cache invalidation for you through OSGi configurations.

Image upload issue in Internet Explorer from Author Dispatcher

If you came to happen to  face issue with image upload from AEM author through dispatcher, this article may help you. You may face issue when you upload an image from image component or uploading images through Assets dashboard. Performing the following things may fix this issue for you-

1. Increase the Upload Buffer Size from OSGi Console (http://host:port/system/console/configMgr)
   Configure service - "Apache Felix Jetty Based Http Service"
Increase following two parameters- "Request Buffer Size" and "Response Buffer Size" to 65536  or a reasonable limit as per your application requirement.


Input Field validation

AEM6 uses Coral UI framework for touch UI rendering. So if you need to implement field validation, you should register a validator on that field supported by Coral UI. Refer the below example-

Sample code to implement mandatory validation on an Input field with trim function-

1. In your component field properties add two new properties- validation-trim (Set value to true) and trimMessage (Set value to the validation message). Look at the screenshot below-


AEM Tag field validation

AEM6 uses Coral UI framework for touch UI rendering. So if you need to implement field validation, you should register a validator on that field supported by Coral UI.

To implement validation on tag input field you can use the following sample code.

1. In your tagspicker input field add one property- tagsMessage (Set value to the validation message). Look at the screenshot below-


Hide a field based on the User Role in a Dialog

If you need to hide a field in a dialog based on User role i.e. user group, you can do it through an Ajax call-

$.ajax({
    type: "GET",
    url: "/libs/granite/security/currentuser.json.rw.userprops.json?props=declaredMemberOf",
    cache: false
}).done(function(data, textStatus, jqXHR) {
    var isMember = false;
    /* The Group ID for which the widget has to be disabled */
    var groupId = "site-editor";
    var membershipInfo = data.declaredMemberOf;
    if (membershipInfo) {
        for (var membershipIdx = 0; membershipIdx < membershipInfo.length; membershipIdx++) {
            if (membershipInfo[membershipIdx].authorizableId == groupId) {
                isMember = true;
                break;
            }
        }
    }
    /*This example disables the Hide in Navigation checkbox on Page Properties dialog of the page*/
    if (isMember) {
        $('[name="./hideInNav"]').prop('disabled', 'true');
    }
});

Ajax call should be invoked at "dialog-ready" event of document. You need to put the above code in a clientlibs JS file with category "cq.authoring.dialog". 

Restriction on size in multifield

Following sample code can be used to put size restriction in a multifield -

1. Add a new property- "maxlinksallowed" to the multifield node in your cq:dialog. Refer the screenshot below-


2. Use this JS code-

$(document).on("dialog-ready", function () {
$(".js-coral-Multifield-add").click(function() {
    var field = $(this).parent();
    var size = field.attr("data-maxlinksallowed");
    if (size) {
        var ui = $(window).adaptTo("foundation-ui");
        var totalLinkCount = $(this).prev('ol').children('li').length;
        if (totalLinkCount >= size) {
            ui.alert("Warning", "Maximum " + size + " links are allowed!", "notice");
            return false;
        }
    }
});
});

You need to put the above code in a clientlibs JS file with category "cq.authoring.dialog".

Auto populate title field based on Path browser path selection

To auto populate page title in a title field based on path value selected in path browser field, you can refer following code snippet-

$(document).ready(function() {
    var textInput;
    var textToInput;
    var inputText;
    var ui = $(window).adaptTo("foundation-ui");
    var s = $(document).on("dialog-ready", function() {
        textInput = $('.js-coral-pathbrowser-button').parent().prev();
        textToInput = $('.js-coral-pathbrowser-button').parent().parent().parent().parent().parent().parent().parent().find("input[name='./page'].coral-Form-field");
      
        $(document).on("click", ".js-coral-pathbrowser-confirm", function() {
            setTimeout(function() {
                inputText = $(textInput).val();
                //$(textToInput).val(inputText.substring(inputText.lastIndexOf("/")+1).split('.')[0]);
                if (!$(textToInput).val()) {
                    $(textToInput).val(inputText.substring(inputText.lastIndexOf("/") + 1));
                }
            }, 1000);
        })
        $(document).on('click', '.js-coral-pathbrowser-button', function() {
            textInput = $(this).parent().prev();
            textToInput = $(this).parent().parent().parent().parent().parent().parent().parent().find("input[name='./page'].coral-Form-field");
        })
        $(document).on("change", " .js-coral-pathbrowser-input", function() {
            inputText = $(this).val();
            if (inputText.indexOf("/content") > 0) {
                textToInput = $(this).parent().parent().parent().parent().parent().parent().parent().find("input[name='./page'].coral-Form-field");
                
                if (!$(textToInput).val()) {
                    $(textToInput).val(inputText.substring(inputText.lastIndexOf("/") + 1));
                }
            }
        });
    });
});

Change the field selector input[name='./page'].coral-Form-field as per your dialog configuration where the title value is to be auto populated.

You need to put the above code in a clientlibs JS file with category "cq.authoring.dialog".

Prefill text field with http, mailto

You can use the below sample code to prefill an input text field with URL/ EMail prefixes based on user input. It prefixes mailto syntax if user input forms an email pattern.

(function($) {
    "use strict";
    $(document).on("change", ".js-coral-pathbrowser-input", function(e) {
        // If it's a relative path - do nothing
        if (this.value.indexOf('/') != 0) {
            // It's not a relative path - treat it as either a mail address or webb address
            if ((this.value.indexOf('@') > -1) && (this.value.indexOf('mailto:') == -1)) {
                // It's a mail address
                $(this).prop("value", 'mailto:' + this.value);
            } else if ((this.value.indexOf('http://') == -1) && (this.value.indexOf('https://') == -1) && (this.value != "") && (this.value.indexOf('mailto:') == -1) && ($(this).parent().parent().hasClass('js-cq-TagsPickerField') == false)) {
                // It's a webb address
                $(this).prop("value", 'http://' + this.value);
            }
        }
        if (this.value.indexOf(' ') >= 0) {
            $(this).prop("value", $.trim(this.value));
            $(this).prop("value", this.value.replace(new RegExp(' ', 'g'), '%20'));
        }
    });
})(Granite.$);

You need to put the above code in a clientlibs JS file with category "cq.authoring.dialog".